감정 분류를 위해 Distilbert를 미세 조정하는 방법

고객 지원 팀은 내가 근무한 모든 회사에서 압도적 인 양의 고객 문의로 익사했습니다. 비슷한 경험이 있습니까?
AI를 자동으로 사용할 수 있다고 말하면 어떨까요? 식별하다,,, 분류, 그리고 심지어 해결하다 가장 일반적인 문제?
BERT와 같은 변압기 모델을 미세 조정하면 발행 유형별로 티켓을 태그하고 올바른 팀으로 라우팅하는 자동화 된 시스템을 구축 할 수 있습니다.
이 튜토리얼에서는 감정 분류를위한 변압기 모델을 5 단계로 미세 조정하는 방법을 보여 드리겠습니다.
- 환경을 설정하십시오: 데이터 세트를 준비하고 필요한 라이브러리를 설치하십시오.
- 로드 및 전처리 데이터: 텍스트 파일을 구문 분석하고 데이터를 구성하십시오.
- 미세 조정 Distilbert: 데이터 세트를 사용하여 감정을 분류하기위한 모델을 훈련시킵니다.
- 성능을 평가하십시오: 정확도, F1- 점수 및 혼동 행렬과 같은 메트릭을 사용하여 모델 성능을 측정하십시오.
- 예측을 해석하십시오: Shap (Shapley additive 설명)을 사용하여 예측을 시각화하고 이해합니다.
결국, 텍스트 입력의 감정을 정확도로 분류하는 미세 조정 모델이 있으며 SHAP을 사용하여 이러한 예측을 해석하는 방법도 배웁니다.
이 동일한 접근 방식은 고객 지원 자동화, 감정 분석, 내용 조정 등과 같은 감정 분류 이외의 실제 사용 사례에 적용될 수 있습니다.
다이빙하자!
올바른 변압기 모델 선택
변압기 모델을 선택할 때 텍스트 분류다음은 가장 일반적인 모델의 빠른 분석입니다.
- 버트: 일반적인 NLP 작업에는 적합하지만 교육과 추론 모두 계산 비용이 많이 듭니다.
- Distilbert: 기능의 97%를 유지하면서 Bert보다 60% 빠릅니다. 실시간 응용 프로그램에 이상적입니다.
- 로베르타 : 더 강력한 버전의 Bert이지만 더 많은 리소스가 필요합니다.
- XLM-Roberta: 로베르타의 다국어 변형은 100 개 언어로 훈련되었습니다. 다국어 작업에 적합하지만 자원 집약적입니다.
이 튜토리얼의 경우 성능과 효율성 사이의 최상의 균형을 제공하기 때문에 Distilbert를 미세 조정하기로 결정했습니다.
1 단계 : 종속성 설정 및 설치
필요한 라이브러리가 설치되어 있는지 확인하십시오.
!pip install datasets transformers torch scikit-learn shap2 단계 :로드 및 전처리 데이터
나는 Kaggle에서 제공되며 상업용 용도로 라이센스를 부여한 Praveen Govi의 NLP에 대한 감정 데이터 세트를 사용했습니다. 감정으로 표시된 텍스트가 포함되어 있습니다. 데이터는 세 개로 나옵니다 .txt 파일 : 기차, 검증, 그리고 시험.
각 줄에는 문장과 해당 감정 레이블이 포함되어 있으며 세미콜론으로 분리됩니다.
text; emotion
"i didnt feel humiliated"; "sadness"
"i am feeling grouchy"; "anger"
"im updating my blog because i feel shitty"; "sadness"
데이터 세트를 Pandas Dataframe에 구문 분석합니다
데이터 세트를로드하겠습니다.
def parse_emotion_file(file_path):
"""
    Parses a text file with each line in the format: {text; emotion}
    and returns a pandas DataFrame with 'text' and 'emotion' columns.

    Args:
    - file_path (str): Path to the .txt file to be parsed

    Returns:
    - df (pd.DataFrame): DataFrame containing 'text' and 'emotion' columns
    """
    texts = []
    emotions = []

    with open(file_path, 'r', encoding='utf-8') as file:
        for line in file:
            try:
                # Split each line by the semicolon separator
                text, emotion = line.strip().split(';')

                # append text and emotion to separate lists
                texts.append(text)
                emotions.append(emotion)
            except ValueError:
                continue

    return pd.DataFrame({'text': texts, 'emotion': emotions})

# Parse text files and store as Pandas DataFrames
train_df = parse_emotion_file("train.txt")
val_df = parse_emotion_file("val.txt")
test_df = parse_emotion_file("test.txt")
레이블 분포 이해
이 데이터 세트에는 포함됩니다 16K 교육 예 그리고 2K 예제 검증 및 테스트 용. 레이블 배포 분석은 다음과 같습니다.
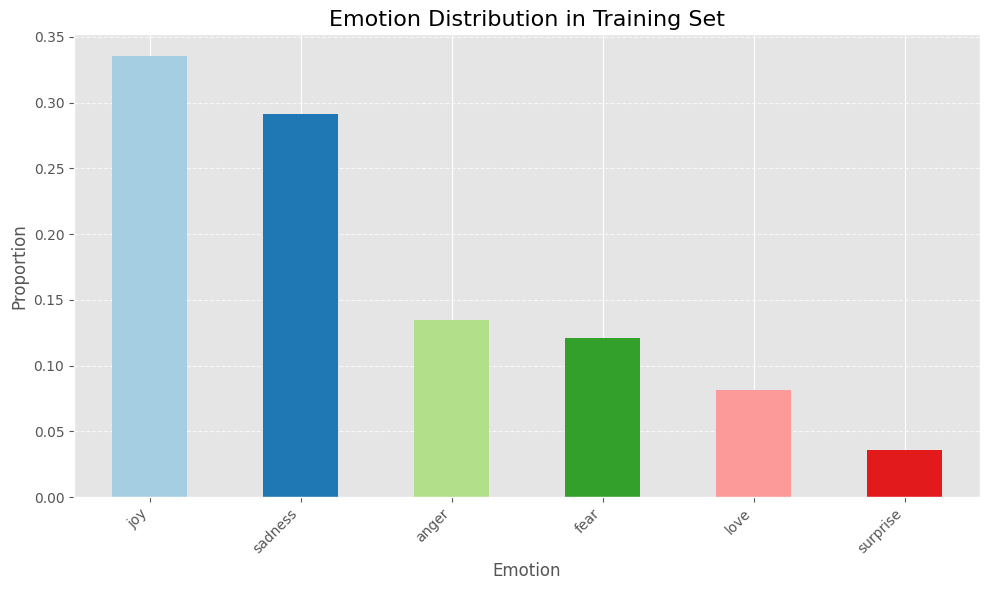
위의 막대 차트는 데이터 세트가 있음을 보여줍니다 불균형, 대부분의 샘플 레이블을 기쁨과 슬픔으로 사용합니다.
생산 모델을 미세 조정하려면이 클래스 불균형 문제를 극복하고 모델의 성능을 향상시키기 위해 다양한 샘플링 기술을 실험하는 것을 고려할 것입니다.
3 단계 : 토큰 화 및 데이터 전처리
다음으로 Distilbert ‘s Tokenizer에로드했습니다.
from transformers import AutoTokenizer

# Define the model path for DistilBERT
model_name = "distilbert-base-uncased"

# Load the tokenizer
tokenizer = AutoTokenizer.from_pretrained(model_name)
그런 다음 텍스트 데이터를 토큰 화하고 레이블을 숫자 ID로 변환하는 데 사용했습니다.
# Tokenize data
def preprocess_function(df, label2id):
    """
    Tokenizes text data and transforms labels into numerical IDs.

    Args:
        df (dict or pandas.Series): A dictionary-like object containing "text" and "emotion" fields.
        label2id (dict): A mapping from emotion labels to numerical IDs.

    Returns:
        dict: A dictionary containing:
              - "input_ids": Encoded token sequences
              - "attention_mask": Mask to indicate padding tokens
              - "label": Numerical labels for classification

    Example usage:
        train_dataset = train_dataset.map(lambda x: preprocess_function(x, tokenizer, label2id), batched=True)
    """
    tokenized_inputs = tokenizer(
        df["text"],
        padding="longest",
        truncation=True,
        max_length=512,
        return_tensors="pt"
    )

    tokenized_inputs["label"] = [label2id.get(emotion, -1) for emotion in df["emotion"]]
    return tokenized_inputs

# Convert the DataFrames to HuggingFace Dataset format
train_dataset = Dataset.from_pandas(train_df)

# Apply the 'preprocess_function' to tokenize text data and transform labels
train_dataset = train_dataset.map(lambda x: preprocess_function(x, label2id), batched=True)
4 단계 : 미세 조정 모델
다음으로, 나는 텍스트 분류 텍스트의 분류 헤드와 함께 미리 훈련 된 Distilbert 모델을로드했습니다. 또한이 데이터 세트의 레이블이 어떻게 보이는지 지정했습니다.
# Get the unique emotion labels from the 'emotion' column in the training DataFrame
labels = train_df["emotion"].unique()

# Create label-to-id and id-to-label mappings
label2id = {label: idx for idx, label in enumerate(labels)}
id2label = {idx: label for idx, label in enumerate(labels)}

# Initialize model
model = AutoModelForSequenceClassification.from_pretrained(
    model_name,
    num_labels=len(labels),
    id2label=id2label,
    label2id=label2id
)
분류를위한 미리 훈련 된 Distilbert 모델은 구성됩니다 5 개의 레이어와 분류 헤드.
오버 피트팅을 방지하기 위해 i 처음 네 층을 얼립니다사전 훈련 중에 배운 지식을 보존합니다. 이를 통해 모델은 일반 언어 이해를 유지하면서 다섯 번째 레이어와 분류 헤드 만 미세 조정하여 데이터 세트에 적응할 수 있습니다. 내가 한 방법은 다음과 같습니다.
# freeze base model parameters
for name, param in model.base_model.named_parameters():
    param.requires_grad = False

# keep classifier trainable
for name, param in model.base_model.named_parameters():
    if "transformer.layer.5" in name or "classifier" in name:
        param.requires_grad = True
메트릭 정의
레이블 불균형을 감안할 때 정확도가 가장 적절한 메트릭이 아닐 수 있다고 생각했기 때문에 정밀도, 리콜, F1- 스코어 및 AUC 점수와 같은 분류 문제에 적합한 다른 메트릭을 포함하기로 결정했습니다.
또한 F1- 점수, 정밀도 및 리콜에 대한 “가중”평균을 사용하여 클래스 불균형 문제를 해결했습니다. 이 매개 변수는 모든 클래스가 메트릭에 비례하여 기여하고 단일 클래스가 결과를 지배하는 것을 방지합니다.
def compute_metrics(p):
    """
    Computes accuracy, F1 score, precision, and recall metrics for multiclass classification.

    Args:
    p (tuple): Tuple containing predictions and labels.

    Returns:
    dict: Dictionary with accuracy, F1 score, precision, and recall metrics, using weighted averaging
          to account for class imbalance in multiclass classification tasks.
    """
    logits, labels = p

    # Convert logits to probabilities using softmax (PyTorch)
    softmax = torch.nn.Softmax(dim=1)
    probs = softmax(torch.tensor(logits))

    # Convert logits to predicted class labels
    preds = probs.argmax(axis=1)

    return {
        "accuracy": accuracy_score(labels, preds),  # Accuracy metric
        "f1_score": f1_score(labels, preds, average="weighted"),  # F1 score with weighted average for imbalanced data
        "precision": precision_score(labels, preds, average="weighted"),  # Precision score with weighted average
        "recall": recall_score(labels, preds, average="weighted"),  # Recall score with weighted average
        "auc_score": roc_auc_score(labels, probs, average="macro", multi_class="ovr")
    }
교육 과정을 설정합시다.
# Define hyperparameters
lr = 2e-5
batch_size = 16
num_epochs = 3
weight_decay = 0.01

# Set up training arguments for fine-tuning models
training_args = TrainingArguments(
    output_dir="./results",
    evaluation_strategy="steps",
    eval_steps=500,
    learning_rate=lr,
    per_device_train_batch_size=batch_size,
    per_device_eval_batch_size=batch_size,
    num_train_epochs=num_epochs,
    weight_decay=weight_decay,
    logging_dir="./logs",
    logging_steps=500,
    load_best_model_at_end=True,
    metric_for_best_model="eval_f1_score",
    greater_is_better=True,
)

# Initialize the Trainer with the model, arguments, and datasets
trainer = Trainer(
    model=model,
    args=training_args,
    train_dataset=train_dataset,
    eval_dataset=val_dataset,
    tokenizer=tokenizer,
    compute_metrics=compute_metrics,
)

# Train the model
print(f"Training {model_name}...")
trainer.train()
5 단계 : 모델 성능 평가
교육 후 테스트 세트에서 모델의 성능을 평가했습니다.
# Generate predictions on the test dataset with fine-tuned model
predictions_finetuned_model = trainer.predict(test_dataset)
preds_finetuned = predictions_finetuned_model.predictions.argmax(axis=1)

# Compute evaluation metrics (accuracy, precision, recall, and F1 score)
eval_results_finetuned_model = compute_metrics((predictions_finetuned_model.predictions, test_dataset["label"]))
이것은 미세 조정 된 Distilbert 모델이 미리 훈련 된 기본 모델과 비교하여 테스트 세트에서 수행 한 방식입니다.

미세 조정하기 전에 미리 훈련 된 모델은 이전에 특정 감정 레이블을 보지 못했기 때문에 데이터 세트에서 제대로 수행되지 않았습니다. AUC 점수 0.5에 반영된 것처럼 그것은 랜덤에 본질적으로 추측하는 것이 었습니다.
미세 조정 후에는 모델이 크게 나타납니다 모든 메트릭에서 개선되었습니다감정을 올바르게 식별 할 때 83% 정확도를 달성합니다. 이는 모델이 16K 교육 샘플만으로도 데이터에서 의미있는 패턴을 성공적으로 배웠다는 것을 보여줍니다.
놀랍습니다!
6 단계 : 쉐어로 예측 해석
나는 세 문장으로 미세 조정 된 모델을 테스트했으며 여기에 예측 한 감정이 있습니다.
- “많은 군중 앞에서 말하는 생각은 내 마음을 경쟁하게 만들고, 나는 불안에 압도 당하기 시작합니다.” → 두려움 😱
- “나는 그들이 얼마나 무례한 지 믿을 수 없습니다! 나는이 프로젝트에서 열심히 일했고, 그들은 심지어 듣지 않고 그것을 해산했습니다. 분노합니다!” → 분노 😡
- “나는이 새로운 전화를 절대적으로 좋아합니다! 카메라 품질은 놀랍고 배터리는 하루 종일 지속되며 너무 빠릅니다. 구매에 더 행복 할 수 없었고 새 전화를 찾는 사람에게는 강력히 추천합니다.” → 기쁨 😀
인상적?!
나는 모델이 어떻게 예측했는지 이해하고 싶었고, Shap (Shapley Additive Explanations)을 사용하여 기능 중요성을 시각화했습니다.
설명자를 만들기 시작했습니다.
# Build a pipeline object for predictions
preds = pipeline(
    "text-classification",
    model=model_finetuned,
    tokenizer=tokenizer,
    return_all_scores=True,
)

# Create an explainer
explainer = shap.Explainer(preds)
그런 다음 설명자를 사용하여 쉐이프 값을 계산했습니다.
# Compute SHAP values using explainer
shap_values = explainer(example_texts)

# Make SHAP text plot
shap.plots.text(shap_values)
아래 플롯은 입력 텍스트의 각 단어가 SHAP 값을 사용하여 모델의 출력에 기여하는 방법을 시각화합니다.

이 경우 음모는“불안”이 감정으로서“두려움”을 예측하는 데 가장 중요한 요소임을 보여줍니다.
쉐이프 텍스트 플롯은 각 단어가 최종 예측에 얼마나 많은 영향을 미치는지 설명하여 예측을 이해하는 멋지고 직관적이며 대화식 방법입니다.
요약
텍스트 데이터에서 감정 분류를 위해 Distilbert를 미세 조정하는 법을 성공적으로 배웠습니다! (여기에서 포옹 얼굴 모델을 확인할 수 있습니다).
변압기 모델은 다음을 포함하여 많은 실제 응용 프로그램에 미세 조정할 수 있습니다.
- 고객 서비스 티켓 태그 (소개에서 논의 된대로),
- 텍스트 기반 대화에서 정신 건강 위험을 표시하고
- 제품 검토에서 감정 감지.
미세 조정은 비교적 작은 데이터 세트를 사용하여 강력한 미리 훈련 된 모델을 특정 작업에 적응시키는 효과적이고 효율적인 방법입니다.
다음에 무엇을 미세 조정 하시겠습니까?
AI 기술을 구축하고 싶습니까?
∎ 나는 실행한다 당신은 주간이 있습니다 그리고 데이터 과학, AI 주말 프로젝트, 데이터 전문가를위한 경력 조언에 대한 주간 블로그 게시물을 작성하십시오.
자원
- Jupyter 노트북 [HERE]
- 포옹 얼굴에 모델 카드 [HERE]
출처 참조


")
가 논란의 여지가 있는 가격 테스트를 종료했다.")


Post Comment