극작가 테스트 수정을 자동화하기 위해 “AI를 사용하여 수정”버튼

엔드 투 엔드 테스트는 응용 프로그램의 신뢰성을 보장하는 데 필수적이지만 좌절의 원인이 될 수도 있습니다. 사용자 인터페이스의 작은 변경조차도 테스트가 실패하여 개발자와 QA 팀이 문제 해결에 시간을 소비하도록 이끌 수 있습니다.
이 블로그 게시물에서는 Chatgpt 또는 Copilot과 같은 AI 도구를 사용하여 극작가 테스트를 자동으로 수정하는 방법을 보여 드리겠습니다. 실패한 테스트에 대한 AI 프롬프트를 작성하고 HTML 보고서에 첨부하는 방법을 배웁니다. 이렇게하면 프롬프트를 AI 도구에 쉽게 복사하여 붙여 넣어 테스트 수정에 대한 빠른 제안을 할 수 있습니다. 테스트 프로세스를 간소화하고 응용 프로그램 신뢰성을 향상시키기 위해 저와 함께하십시오!
다이빙하자!
계획
솔루션은 세 가지 간단한 단계로 나옵니다.
- 극작가 테스트가 실패한 시점을 식별하십시오.
- 필요한 모든 컨텍스트로 AI 프롬프트를 만듭니다.
- 오류 메시지
- 테스트 코드의 스 니펫
- 페이지의 Aria 스냅 샷
- 프롬프트를 극작가 HTML 보고서에 통합하십시오.
이 단계를 수행하면 엔드 투 엔드 테스트 과정을 향상시키고 극작가 테스트를 산들 바람으로 만들 수 있습니다.
단계별 가이드
1 단계 : 실패한 테스트 감지
극작가에서 실패한 테스트를 감지하려면 테스트가 완료된 후 분해 단계에서 테스트 결과를 확인하는 맞춤형 고정 장치를 만들 수 있습니다. 오류가있는 경우 testInfo.error 그리고 테스트는 재조정되지 않으며, 고정물은 유용한 프롬프트를 생성합니다. 아래 코드 스 니펫을 확인하십시오.
import { test as base } from '@playwright/test';
import { attachAIFix } from '../../ai/fix-with-ai'

export const test = base.extend({
  fixWithAI: [async ({ page }, use, testInfo) => {
        await use()
        await attachAIFix(page, testInfo)
    }, { scope: 'test', auto: true }]
});
2 단계 : 프롬프트 구축
프롬프트 템플릿
간단한 개념 증명 프롬프트로 시작하겠습니다 (나중에 개선 할 수 있음) :
You are an expert in Playwright testing.
Your task is to fix the error in the Playwright test titled "{title}".

- First, provide a highlighted diff of the corrected code snippet.
- Base your fix solely on the ARIA snapshot of the page.
- Do not introduce any new code.
- Avoid adding comments within the code.
- Ensure that the test logic remains unchanged.
- Use only role-based locators such as getByRole, getByLabel, etc.
- For any 'heading' roles, try to adjust the heading level first.
- At the end, include concise notes summarizing the changes made.
- If the test appears to be correct and the issue is a bug on the page, please note that as well.

Input:

{error}

Code snippet of the failing test:

{snippet}

ARIA snapshot of the page:

{ariaSnapshot}
필요한 데이터로 프롬프트를 작성해 봅시다.
오류 메시지
극작가는 오류 메시지를 저장합니다 testInfo.error.message. 그러나 터미널의 채색 출력을위한 특수 ASCII 제어 코드가 포함됩니다 (예 : [2m or [22m):
TimeoutError: locator.click: Timeout 1000ms exceeded.
Call log:
[2m  - waiting for getByRole('button', { name: 'Get started' })[22m
After investigating Playwright’s source code, I found a stripAnsiEscapes function that removes these special symbols:
const clearedErrorMessage = stripAnsiEscapes(testInfo.error.message);Cleared error message:
TimeoutError: locator.click: Timeout 1000ms exceeded.
Call log:
  - waiting for getByRole('button', { name: 'Get started' })
This cleaned-up message can be inserted into the prompt template.
Code Snippet
The test code snippet is crucial for AI to generate the necessary code changes. Playwright often includes these snippets in its reports, for example:
  4 | test('get started link', async ({ page }) => {
  5 |   await page.goto('
> 6 |   await page.getByRole('button', { name: 'Get started' }).click();
    |                                                           ^
  7 |   await expect(page.getByRole('heading', { level: 3, name: 'Installation' })).toBeVisible();
  8 | });
You can see how Playwright internally generates these snippets. I’ve extracted the relevant code into a helper function, getCodeSnippet(), to retrieve the source code lines from the error stack trace:
const snippet = getCodeSnippet(testInfo.error);
ARIA Snapshot
ARIA snapshots, introduced in Playwright 1.49, provide a structured view of the page’s accessibility tree. Here’s an example ARIA snapshot showing the navigation menu on the Playwright homepage:
- document:
  - navigation "Main":
    - link "Playwright logo Playwright":
      - img "Playwright logo"
      - text: Playwright
    - link "Docs"
    - link "API"
    - button "Node.js"
    - link "Community"
  ...
While ARIA snapshots are primarily used for snapshot comparison, they are also a game-changer for AI prompts in web testing. Compared to raw HTML, ARIA snapshots offer:
- Small size → Less risk of hitting prompt limits
- Less noise → Less unnecessary context
- Role-based structure → Encourages AI to generate role-based locators
Playwright provides .ariaSnapshot(), which you can call on any element. For AI to fix a test, it makes sense to include the ARIA snapshot of the entire page retrieved from the root element:
const ariaSnapshot = await page.locator('html').ariaSnapshot();Assembling the Prompt
Finally, combine all the pieces into one prompt:
const errorMessage = stripAnsiEscapes(testInfo.error.message);
const snippet = getCodeSnippet(testInfo.error);
const ariaSnapshot = await page.locator('html').ariaSnapshot();

const prompt = promptTemplate
  .replace('{title}', testInfo.title)
  .replace('{error}', errorMessage)
  .replace('{snippet}', snippet)
  .replace('{ariaSnapshot}', ariaSnapshot);
Example of the generated prompt:
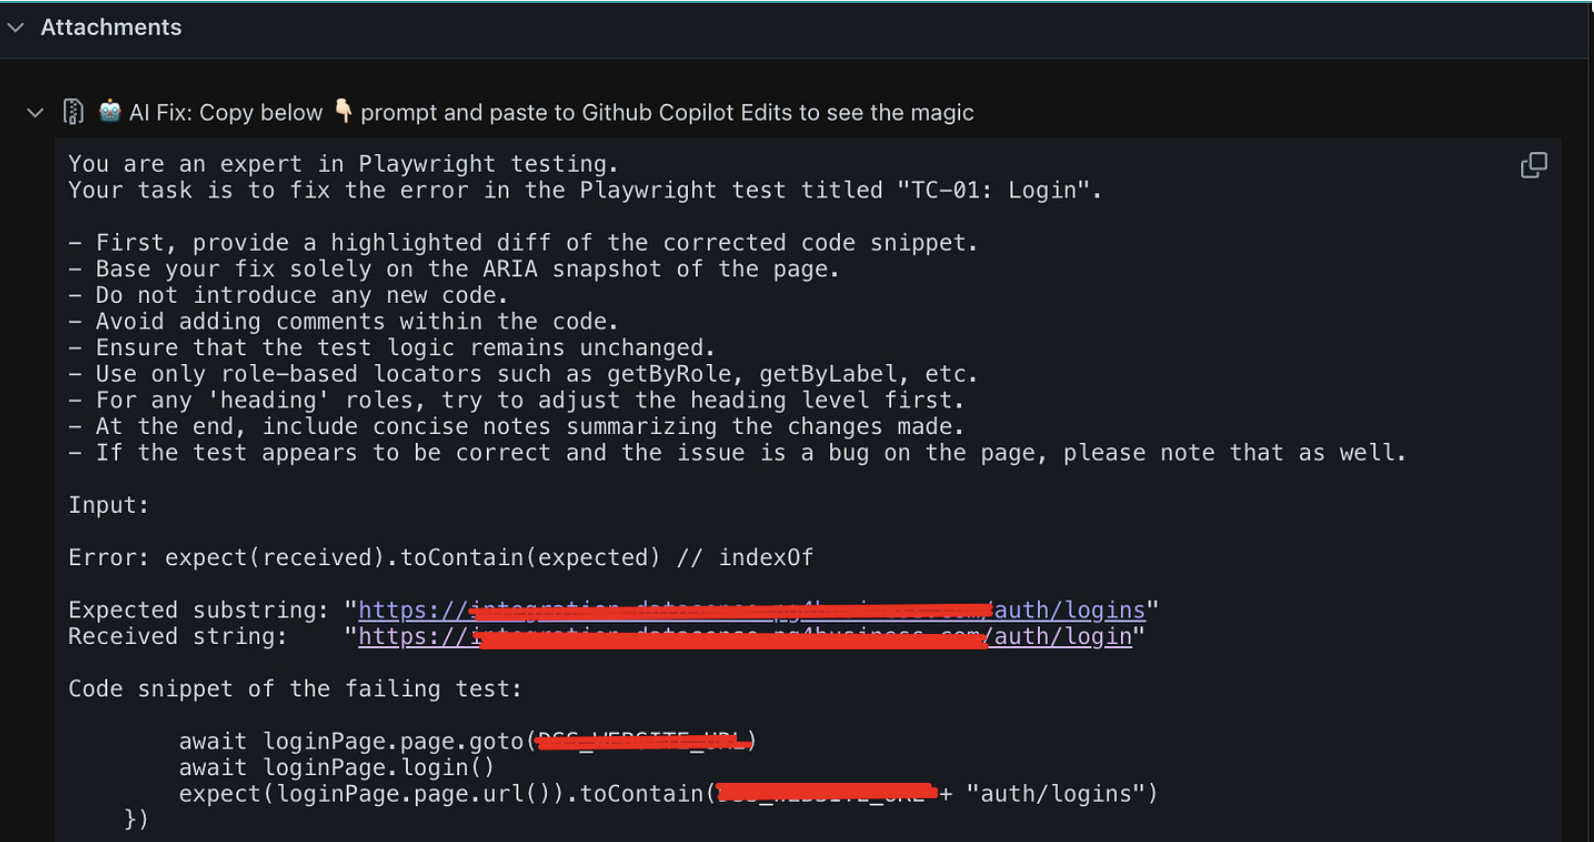
Step 3: Attach the Prompt to the Report
When the prompt is built, you can attach it to the test using testInfo.attach:
export async function attachAIFix(page: Page, testInfo: TestInfo) {
    const willRetry = testInfo.retry
Now, whenever a test fails, the HTML report will include an attachment labeled “Fix with AI.”
Fix Using Copilot Edits
When it comes to using ChatGPT for fixing tests, you typically have to manually implement the suggested changes. However, you can make this process much more efficient by using Copilot. Instead of pasting the prompt into ChatGPT, simply open the Copilot edits window in VS Code and paste your prompt there. Copilot will then recommend code changes that you can quickly review and apply — all from within your editor.
Check out this demo video of fixing a test with Copilot in VS Code:
“AI와 함께 수정”을 프로젝트에 통합합니다
Vitaliy Potapov는 “AI를 사용한 수정”워크 플로를 보여주는 완전히 작동하는 GitHub 리포지토리를 만들었습니다. 자유롭게 탐색하고 테스트를 실행하고 생성 된 프롬프트를 확인하고 AI 도움말로 오류를 수정하십시오.
“Fix with AI”흐름을 자신의 프로젝트에 통합하려면 다음을 수행하십시오.
- 극작가 1.49 또는 새로 사용 중인지 확인하십시오
- 복사
fix-with-ai.ts테스트 디렉토리에 파일을 파일하십시오 - AI-Attachment 비품 등록 :
import { test as base } from '@playwright/test';
import { attachAIFix } from '../../ai/fix-with-ai'

export const test = base.extend({
  fixWithAI: [async ({ page }, use, testInfo) => {
        await use()
        await attachAIFix(page, testInfo)
    }, { scope: 'test', auto: true }]
});
테스트를 실행하고 HTML 보고서를 열려면 실패한 테스트에서 “AI가있는 수정”첨부 파일을 확인하십시오.
여기에서 프롬프트를 Chatgpt 또는 Github Copilot에 복사하여 붙여 넣거나 Copilot의 편집 모드를 사용하여 코드 변경 사항을 자동으로 적용하십시오.
관련 링크
“AI를 사용한 수정”프로세스를 훨씬 더 매끄럽게 만들기위한 귀하의 생각이나 신속한 제안을 듣고 싶습니다. 의견에 의견을 공유하십시오.
읽어 주셔서 감사합니다. AI와 함께 행복한 테스트!
.webp?w=1920&resize=1920,960&ssl=1 "잘못된 데이터 스토리텔링의 심리학: 사람들이 데이터를 잘못 읽는 이유")


: 소형, 예산, 액세서리")

Post Comment