제로에서 영웅까지의 AI 에이전트 – 1 부

소개
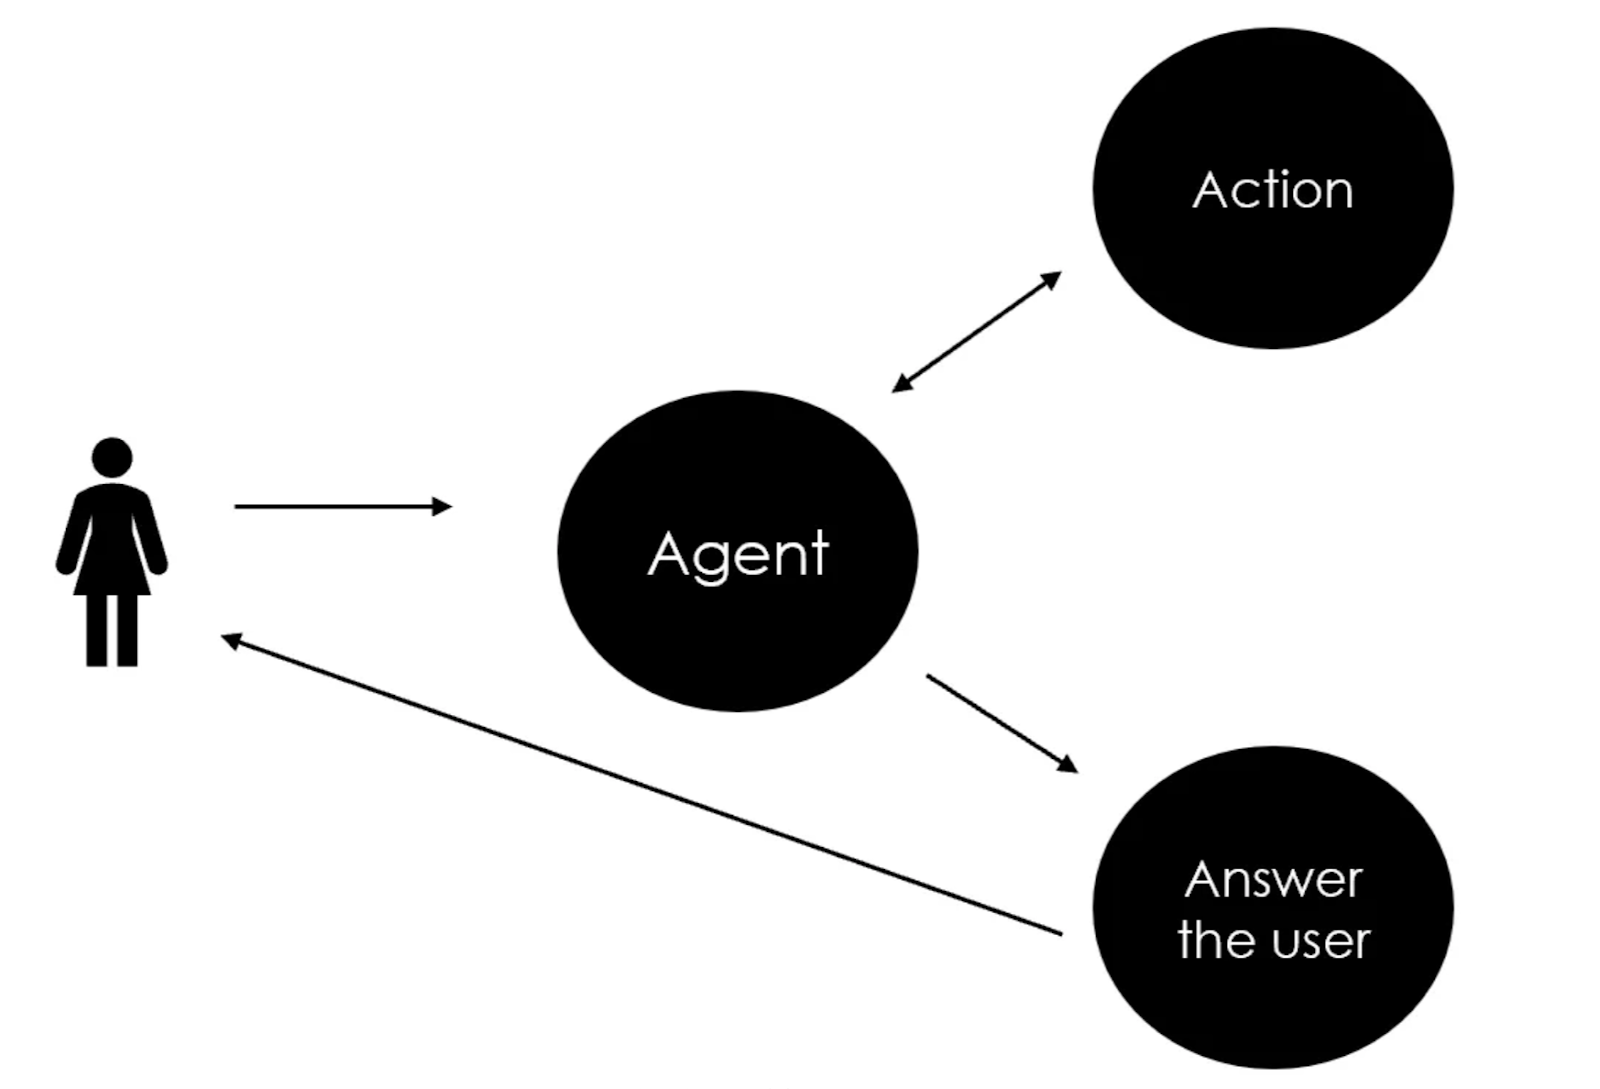
AI 요원 작업을 수행하고 결정을 내리고 다른 사람들과 의사 소통하는 자율 프로그램입니다. 일반적으로 작업을 완료하는 데 도움이되는 일련의 도구를 사용합니다. Genai 응용 프로그램에서 이러한 에이전트는 순차적 추론을 처리하고 LLM 지식이 충분하지 않을 때 외부 도구 (웹 검색 또는 데이터베이스 쿼리와 같은)를 사용할 수 있습니다. 불확실한 경우 임의의 텍스트를 생성하는 기본 챗봇과 달리 AI 에이전트는 도구를 활성화하여보다 정확하고 구체적인 응답을 제공합니다.
우리는 개념에 더 가까이 다가 가고 있습니다. 에이전트 AI : 직접적인 인간의 개입없이 더 높은 수준의 자율성 및 의사 결정 능력을 나타내는 시스템. 오늘날의 AI 요원은 인간의 입력에 반응적으로 반응하지만 내일의 에이전트 AI는 사전에 문제 해결에 관여하며 상황에 따라 행동을 조정할 수 있습니다.
오늘날, 처음부터 에이전트를 처음부터 건축하는 것은 10 년 전에 로지스틱 회귀 모델을 훈련하는 것만 큼 쉬워지고 있습니다. 당시에는 Scikit-Learn 단순한 라이브러리를 제공하여 몇 줄의 코드만으로 기계 학습 모델을 신속하게 훈련시켜 기본 복잡성을 많이 추상화했습니다.
이 튜토리얼에서는 방법을 보여 드리겠습니다 처음부터 다른 유형의 AI 에이전트를 구축하십시오간단한 시스템에서보다 고급 시스템까지. 다른 유사한 경우 (복사, 붙여 넣기, 실행)에 쉽게 적용 할 수있는 유용한 파이썬 코드를 제시 하고이 예제를 복제 할 수 있도록 모든 코드 라인을 주석으로 걸어갑니다.
설정
내가 말했듯이, GPU 또는 API 키없이 사용자 정의 에이전트를 무료로 무료로 실행할 수 있습니다. 필요한 유일한 도서관은입니다 올라마 (pip install ollama==0.4.7), 사용자는 클라우드 기반 서비스없이 LLM을 로컬로 실행할 수 있으므로 데이터 개인 정보 및 성능을보다 잘 제어 할 수 있습니다.
우선, 다운로드해야합니다 올라마 웹 사이트에서.

그런 다음 노트북의 프롬프트 쉘에서 명령을 사용하여 선택한 LLM을 다운로드하십시오. 나는 알리바바와 함께 간다 Qwen그것은 똑똑하고 라이트입니다.
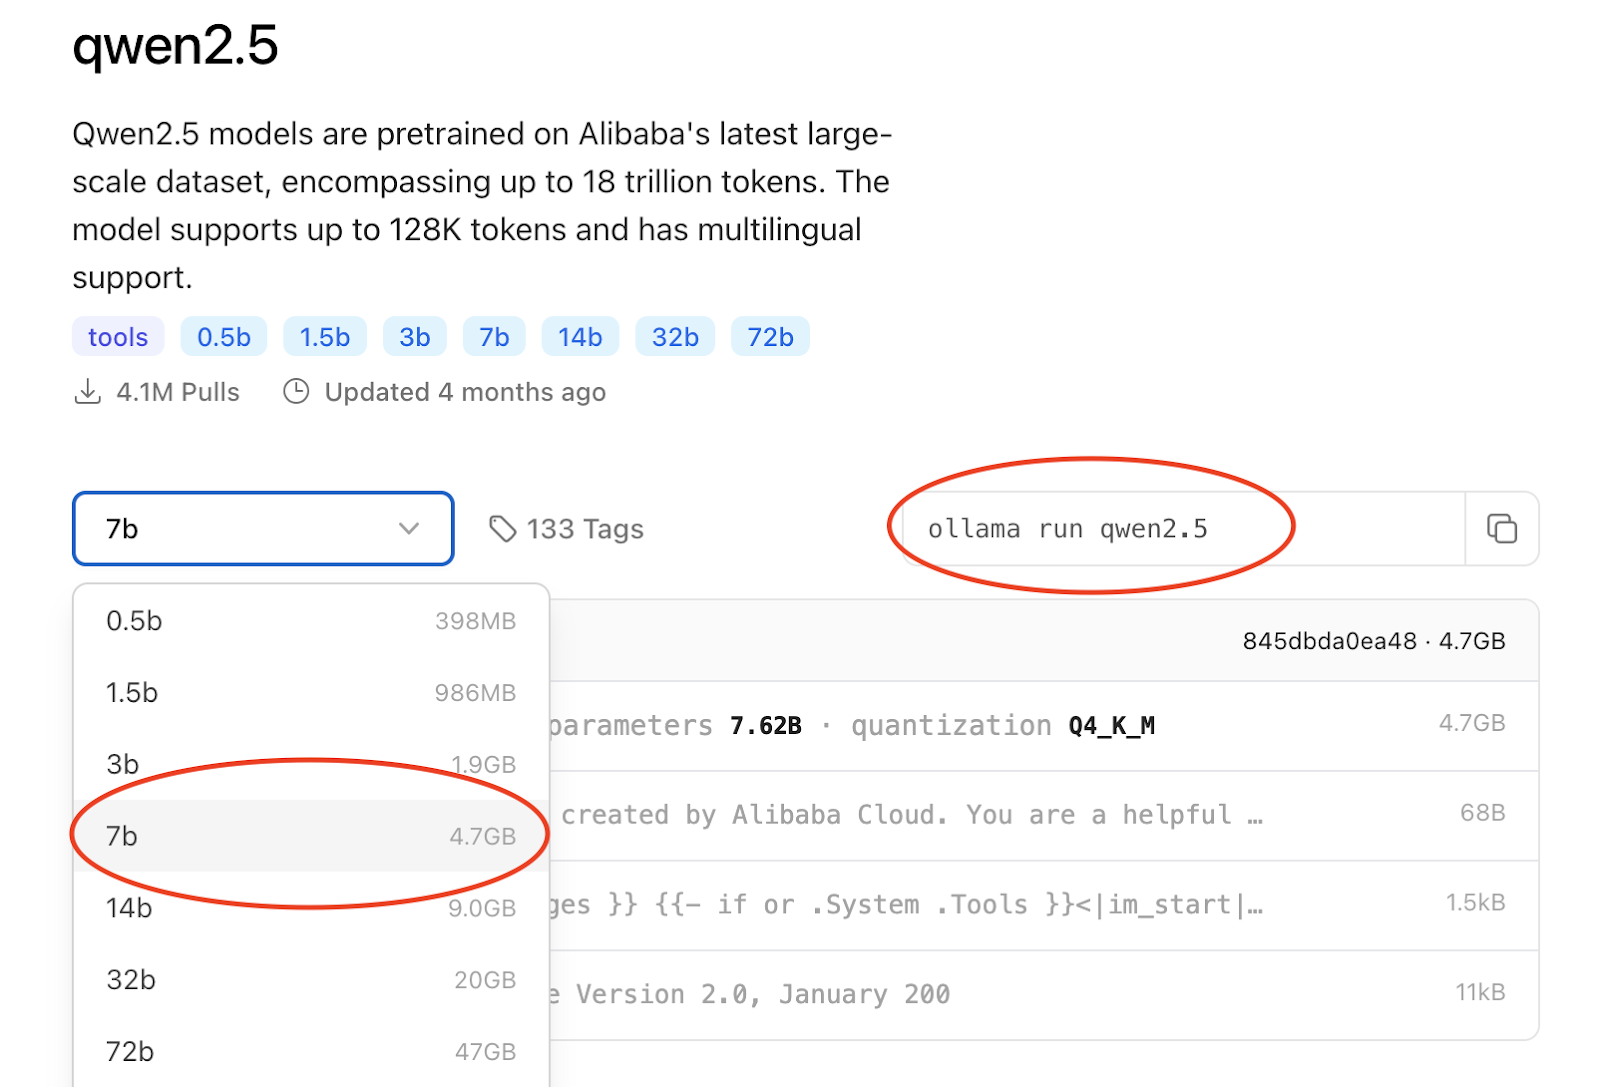
다운로드가 완료되면 Python으로 이동하여 코드 작성을 시작할 수 있습니다.
import ollama
llm = "qwen2.5"
LLM을 테스트합시다 :
stream = ollama.generate(model=llm, prompt=""'what time is it?''', stream=True)
for chunk in stream:
    print(chunk['response'], end='', flush=True)
분명히, LLM 그 자체는 매우 제한적이며 채팅 외에는 많이 할 수 없습니다. 그러므로 우리는 그것을 행동하거나, 즉 도구 활성화.
가장 일반적인 도구 중 하나는 인터넷 검색. 파이썬에서 가장 쉬운 방법은 유명한 개인 브라우저입니다. Duckduckgo (pip install duckduckgo-search==6.3.5). 원래 라이브러리를 직접 사용하거나 가져올 수 있습니다. 랭케인 래퍼 (래퍼)pip install langchain-community==0.3.17).
와 함께 올라마도구를 사용하려면 기능을 사전에 설명해야합니다.
from langchain_community.tools import DuckDuckGoSearchResults
def search_web(query: str) -> str:
  return DuckDuckGoSearchResults(backend="news").run(query)

tool_search_web = {'type':'function', 'function':{
  'name': 'search_web',
  'description': 'Search the web',
  'parameters': {'type': 'object',
                'required': ['query'],
                'properties': {
                    'query': {'type':'str', 'description':'the topic or subject to search on the web'},
}}}}
## test
search_web(query="nvidia")
인터넷 검색은 매우 광범위 할 수 있으며 에이전트에게 더 정확한 옵션을 제공하고 싶습니다. 이 에이전트를 사용하여 재무 업데이트에 대해 배울 계획이므로 전체 웹 대신 재무 웹 사이트 만 검색하는 등 해당 주제에 대한 특정 도구를 제공 할 수 있습니다.
def search_yf(query: str) -> str:
  engine = DuckDuckGoSearchResults(backend="news")
  return engine.run(f"site:finance.yahoo.com {query}")

tool_search_yf = {'type':'function', 'function':{
  'name': 'search_yf',
  'description': 'Search for specific financial news',
  'parameters': {'type': 'object',
                'required': ['query'],
                'properties': {
                    'query': {'type':'str', 'description':'the financial topic or subject to search'},
}}}}

## test
search_yf(query="nvidia")
간단한 에이전트 (WebSearch)
제 생각에, 가장 기본적인 에이전트는 최소한 하나 또는 두 개의 도구 중 하나를 선택하고 작업의 출력을 재사색하여 사용자에게 적절하고 간결한 답변을 제공해야합니다.
먼저, 에이전트의 목적을 설명하기 위해 프롬프트를 작성해야합니다. 더 자세한 (광산은 매우 일반적입니다). 이는 LLM과의 채팅 기록에서 첫 번째 메시지가 될 것입니다.
prompt=""'You are an assistant with access to tools, you must decide when to use tools to answer user message.'''
messages = [{"role":"system", "content":prompt}]
AI와 채팅을 유지하려면 사용자의 입력으로 시작하는 루프를 사용한 다음 에이전트가 호출되어 응답을받습니다 (LLM의 텍스트 또는 도구 활성화).
while True:
    ## user input
    try:
        q = input('🙂 >')
    except EOFError:
        break
    if q == "quit":
        break
    if q.strip() == "":
        continue
    messages.append( {"role":"user", "content":q} )

    ## model
    agent_res = ollama.chat(
        model=llm,
        tools=[tool_search_web, tool_search_yf],
        messages=messages)
이 시점까지, 채팅 기록은 다음과 같이 보일 수 있습니다.

모델이 도구를 사용하려면 LLM에서 제안한 입력 매개 변수로 적절한 기능을 실행해야합니다.
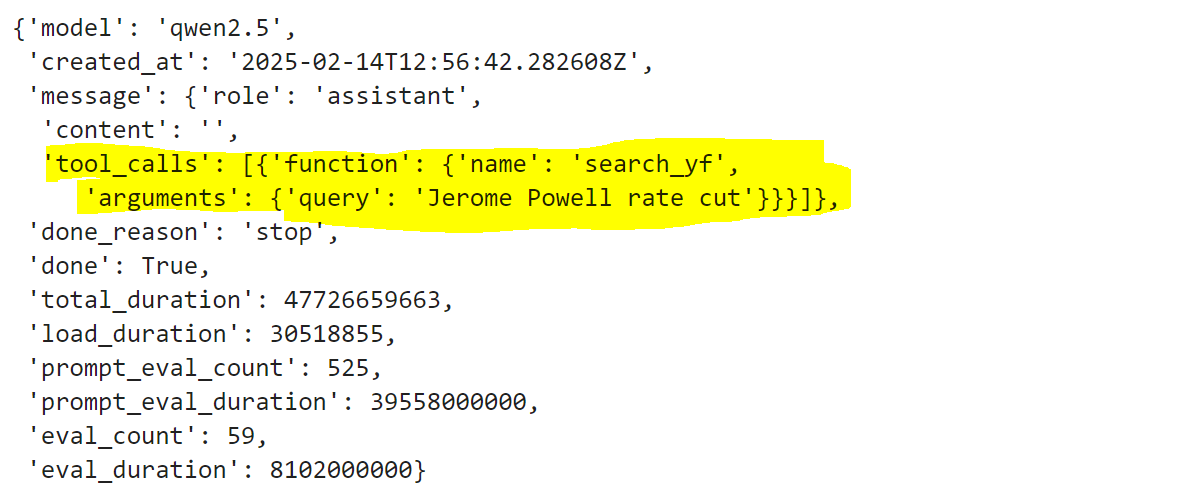
따라서 코드는 해당 정보를 가져 와서 공구 기능을 실행해야합니다.
## 응답 dic_tools = { 'search_web': search_web, 'search_yf': search_yf} agent_res의 "툴박 콜스"인 경우["message"].keys () : agent_res의 도구 용["message"]["tool_calls"]: t_name, t_inputs = 도구["function"]["name"]도구["function"]["arguments"]


            if f : = dic_tools.get (t_name) : ### 통화 도구 인쇄 ( '🔧 🔧>', f "\ x1b[1;31m{t_name} -> Inputs: {t_inputs}\x1b[0m")
                messages.append( {"role":"user", "content":"use tool '"+t_name+"' with inputs: "+str(t_inputs)} )
                ### tool output
                t_output = f(**tool["function"]["arguments"]) print (t_output) ### final res p = f '' ''사용자 질문에 답하기 위해 이것을 요약하고 가능한 한 간결하게하십시오 : {t_output} '' 'res = ollama.generate (model = llm, prompt = q+". "+P)["response"]
            else : print ( '' '>', f "\ x1b[1;31m{t_name} -> NotFound\x1b[0m")

    if agent_res['message']['content']    ! = '': res = agent_res["message"]["content"]


    print ( "" ">", f "\ x1b[1;30m{res}\x1b[0m")
    messages.append( {"role":"assistant", "content":res} )
Now, if we run the full code, we can chat with our Agent.

Advanced Agent (Coding)
LLMs know how to code by being exposed to a large corpus of both code and natural language text, where they learn patterns, syntax, and semantics of Programming languages. The model learns the relationships between different parts of the code by predicting the next token in a sequence. In short, LLMs can generate Python code but can’t execute it, Agents can.
I shall prepare a Tool allowing the Agent to execute code. In Python, you can easily create a shell to run code as a string with the native command exec().
import io
import contextlib

def code_exec(code: str) -> str:\
    output = io.StringIO()
    with contextlib.redirect_stdout(output):
        try:
            exec(code)
        except Exception as e:
            print(f"Error: {e}")
    return output.getvalue()

tool_code_exec = {'type':'function', 'function':{
  'name': 'code_exec',
  'description': 'execute python code',
  'parameters': {'type': 'object',
                'required': ['code']'속성': { 'code': { 'type': 'str', 'description': 'code to execute'},}}} ## test code_exec ( "a = 1+1; print (a) ")
이전과 마찬가지로 프롬프트를 작성하지만 이번에는 채팅 루프의 시작 부분에서 사용자에게 파일 경로를 제공하도록 요청합니다.
prompt=""'You are an expert data scientist, and you have tools to execute python code.
First of all, execute the following code exactly as it is: 'df=pd.read_csv(path); print(df.head())'
If you create a plot, ALWAYS add 'plt.show()' at the end.
'''
messages = [{"role":"system", "content":prompt}]
start = True
while True:
## user input
try:
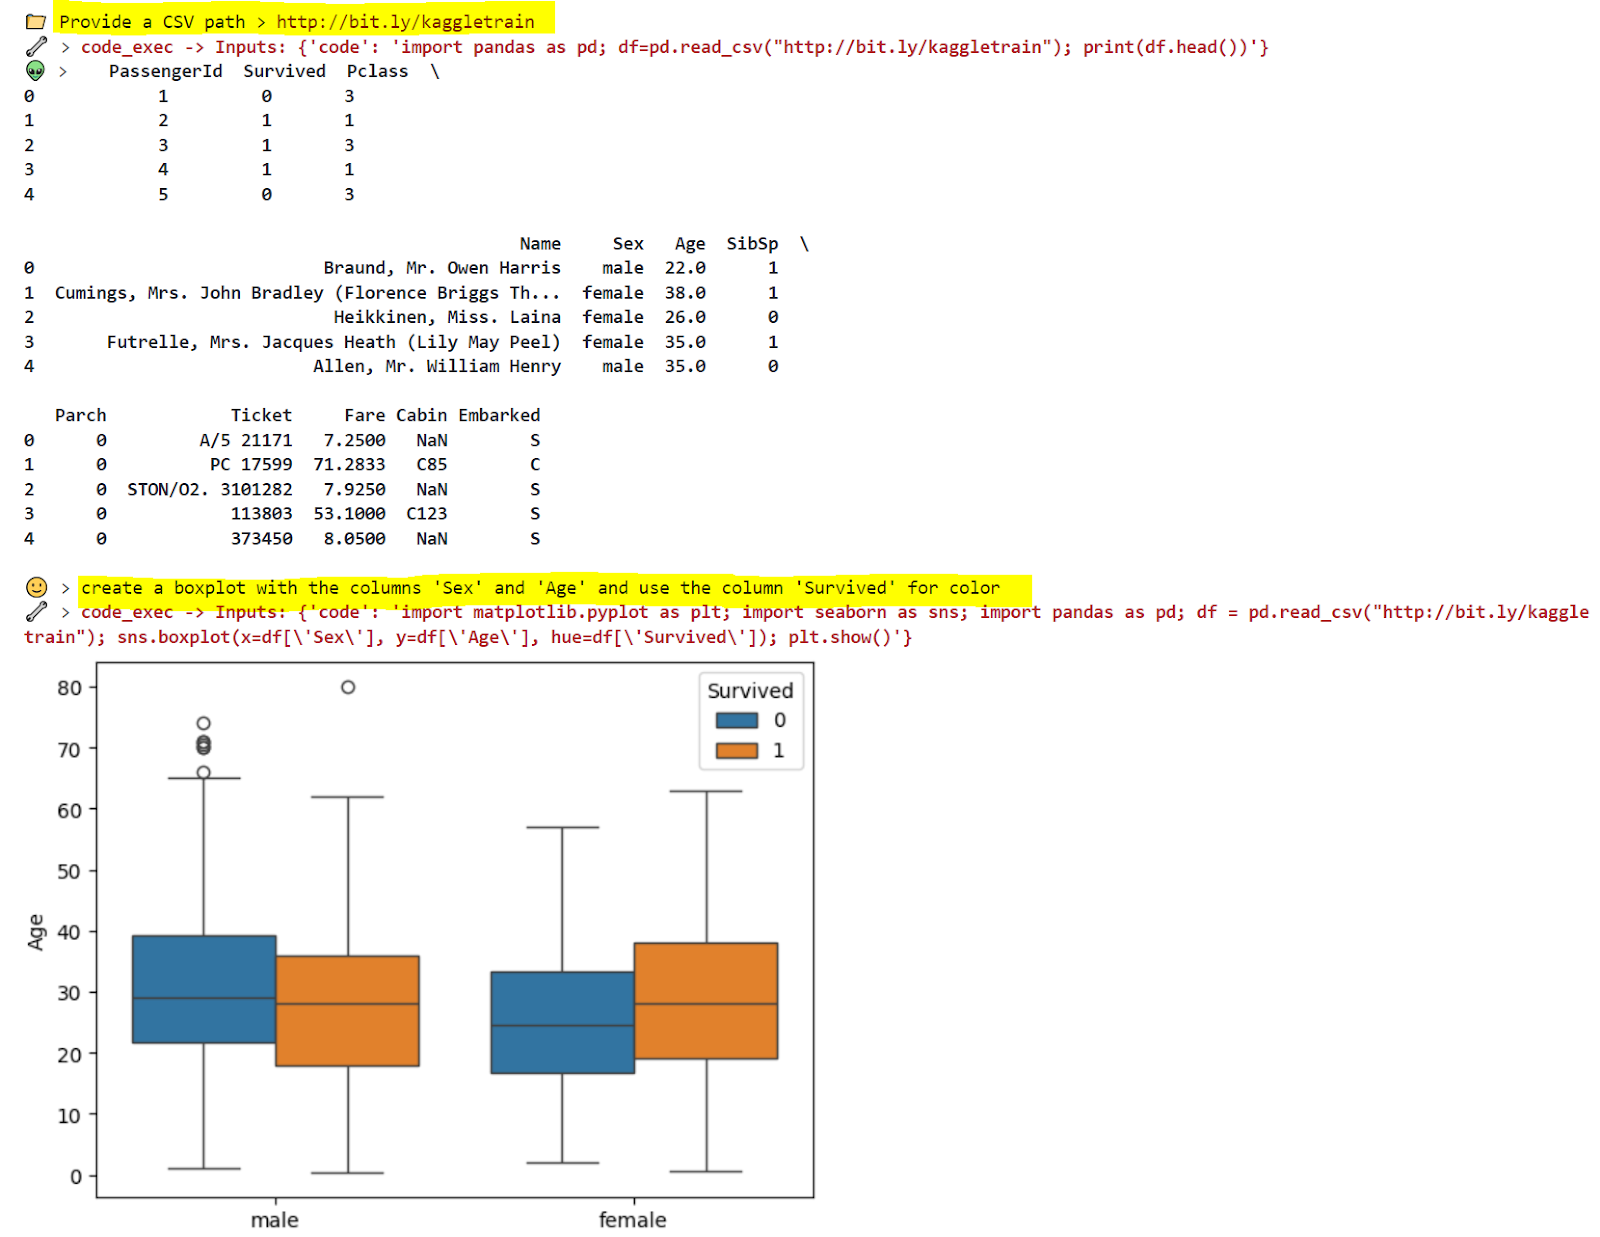
if start is True:
path = input('📁 Provide a CSV path >')
q = "path = "+path
else:
q = input('🙂 >')
except EOFError:
break
if q == "quit":
break
if q.strip() == "":
continue
messages.append( {"role":"user", "content":q} )코딩 작업은 LLM에 대해 약간 까다로울 수 있으므로 추가하겠습니다. 메모리 강화. 기본적으로 한 세션 동안 진정한 장기 메모리가 없습니다. LLM은 채팅 기록에 액세스 할 수 있으므로 정보를 일시적으로 기억하고 대화 초기에 주어진 상황과 지침을 추적 할 수 있습니다. 그러나 특히 LLM이 작은 경우 메모리가 항상 예상대로 작동하지는 않습니다. 따라서 좋은 관행은 채팅 기록에서 주기적 알림을 추가하여 모델의 메모리를 강화하는 것입니다.
prompt=""'You are an expert data scientist, and you have tools to execute python code.
First of all, execute the following code exactly as it is: 'df=pd.read_csv(path); print(df.head())'
If you create a plot, ALWAYS add 'plt.show()' at the end.
'''
messages = [{"role":"system", "content":prompt}]
memory = '''Use the dataframe 'df'.'''
start = True

while True:
    ## user input
    try:
        if start is True:
            path = input('📁 Provide a CSV path >')
            q = "path = "+path
        else:
            q = input('🙂 >')
    except EOFError:
        break
    if q == "quit":
        break
    if q.strip() == "":
        continue

    ## memory
    if start is False:
        q = memory+"\n"+q
    messages.append( {"role":"user", "content":q} )
Ollama의 기본 메모리 길이는 2048 자입니다. 컴퓨터를 처리 할 수있는 경우 LLM이 호출 될 때 숫자를 변경하여 다음을 늘릴 수 있습니다.
    ## model
    agent_res = ollama.chat(
        model=llm,
        tools=[tool_code_exec],
        options={"num_ctx":2048},
        messages=messages)
이 usecase에서 에이전트의 출력은 대부분 코드 및 데이터이므로 LLM이 응답을 재사색하는 것을 원하지 않습니다.
        ## 응답 dic_tools = { 'code_exec': code_exec} agent_res에서 "툴박"인 경우["message"].keys () : agent_res의 도구 용["message"]["tool_calls"]: t_name, t_inputs = 도구["function"]["name"]도구["function"]["arguments"]


            if f : = dic_tools.get (t_name) : ### 통화 공구 인쇄 ( '🔧 🔧>', f "\ x1b[1;31m{t_name} -> Inputs: {t_inputs}\x1b[0m")
                messages.append( {"role":"user", "content":"use tool '"+t_name+"' with inputs: "+str(t_inputs)} )
                ### tool output
                t_output = f(**tool["function"]["arguments"]) ### final res res = t_output else : print ( '🤬 🤬>', f "\ x1b[1;31m{t_name} -> NotFound\x1b[0m")

    if agent_res['message']['content']    ! = '': res = agent_res["message"]["content"]


    print ( "" ">", f "\ x1b[1;30m{res}\x1b[0m")
    messages.append( {"role":"assistant", "content":res} )
    start = False
Now, if we run the full code, we can chat with our Agent.
Conclusion
This article has covered the foundational steps of creating Agents from scratch using only Ollama. With these building blocks in place, you are already equipped to start developing your own Agents for different use cases.
Stay tuned for Part 2, where we will dive deeper into more advanced examples.
Full code for this article: GitHub
I hope you enjoyed it! Feel free to contact me for questions and feedback or just to share your interesting projects.
👉 Let’s Connect 👈

출처 참조
")


Post Comment